Additive manufacturing (AM) is a potentially disruptive technology across multiple industries, such as the aerospace, precision manufacturing, and metal. Different from conventional material removal methods, AM is based on layer-by-layer shaping and consolidation of feedstock to arbitrary configurations. However, AM generally has a complex nonequilibrium physical and chemical metallurgical nature, leading to unstable manufacturing quality. Therefore, the chemical compositions, structural information, and mechanical properties of AM components need to be detected. Up to now, the detection of elemental compositions, structural defects, and residual stress are the most urgently required.
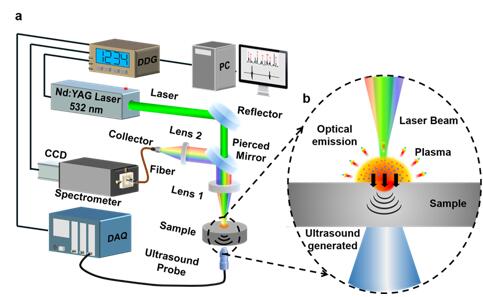
Associate prof. Lianbo Guo’s group of Wuhan National Laboratory for Optoelectronics (WNLO), Huazhong University of Science and Technology (HUST), cooperating with Prof. Yongfeng Lu from University of Nebraska, Lincoln, and Associate prof. Wei Luo from school of Optical and Electronic Information, HUST, investigated a laser opto-ultrasonic dual (LOUD) detection. As shown in Figure 1, LOUD applied single-pulse laser to irradiate the sample surfaces. With high energy laser irradiating, the surfaces were ablated and vapored to form a plasma. On the one hand, atoms in plasmas were transited from the ground states to excited states, for which photons with different wavelengths emitted can be used to quantitatively analyze the types and contents of elements. On the other hand, the plasmas absorbed laser energy and expanded, producing an impulse of acoustic source on the surface, which generated high-frequency and multimode ultrasonic waves inside the sample. Collecting and processing the acoustic signals, we can detect and analyze both structure and residual stresses in the sample. Therefore, the LOUD detection makes simultaneous and real-time detection of elemental compositions, structural defects, and residual stress for wire + arc additive manufacturing (WAAM) come true for the first time.

Figure 1 schematics of laser opto-ultrasonic probe detection.
Firstly, researchers detected a typical laser-welded aluminum (Al) alloy sample, in the middle of which there was a weld, as shown in Figure 2. In order to modify a defect case, researchers also drilled a 2-mm diameter hole as an artificial defect. Figure 2a and Figure 2b showed the distributions of the Silicon element obtained by LOUD detection and Electron-probe Microanalysis (EPMA) detection, respectively. Figure 2c and Figure 2d were the results of LOUD and digital radiography (DR), respectively. Figure 2e showed the linear-scanning results of the residual stresses using LOUD detection and conventional ultrasonic detection. Figure 2f showed the 3D mapping of the residual stress distribution near the weld using LOUD detection. The results indicated that the relative error of each index was less than 5%.

Figure 2 detection of a laser-welded Al alloy sample.
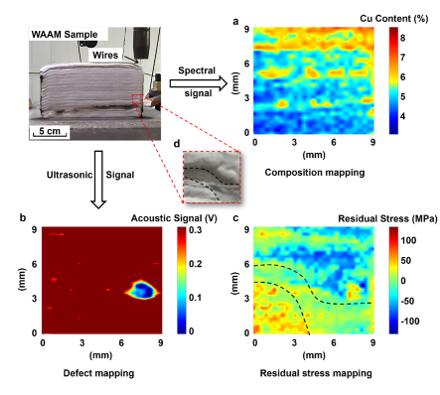
Next, researchers detected a WAAM sample using LOUD. The Copper element mapping was shown in Figure 3a, and Figure 3b was the result of defect mapping, Figure 3c showed the residual stress distribution in the WAAM sample. Comparing the results of LOUD detection with conventional detection, it can be found that the average relative error is within 10%.

Figure 3 detection of WAAM sample.
This study obtained great supports from National Nature Science Foundation of China (No. 61575073). Associate prof. Lianbo Guo, Prof. Yongfeng Lu, and Associate prof. Wei Luo are co-corresponding authors. Doc. Yuyang Ma is the first author. Zhenlin Hu, Yun Tang,Shixiang Ma, Yanwu Chu, Xin Li and Prof. Xiaoyan Zeng participated relevant work as co-authors. Thanks for Prof. Ming Gao, WNLO, Prof. Xiangyou Li, WNLO, and Prof. Zhenggan Zhou, Beihang University, providing significant supports with experimental facilities.